Testing is an element of any software development, and certainly it’s a big part of robot programming. You’ve probably already done a lot of robot testing; deploy your code and test the robot. Hopefully you’re already familiar with the idea of unit testing of small functions, but we can also automate the testing of whole subsystems.
Unit testing with WPILib
To demonstrate automated testing of robot subsystems, we’ll use a simplified robot program. This program runs on a real robot build for the 2016 game, FIRST Stronghold.
A simple subsystem
In the WPILib command pattern a subsystem class represents a physical subset of the robot. A subsystem contains physical components, such as motors and sensors. There will be actions to perform on the subsystem, such as to drive or shoot. For this example, we have a simple robot with two subsystems representing the robot chassis with its drive motors, and a shooter for throwing balls.
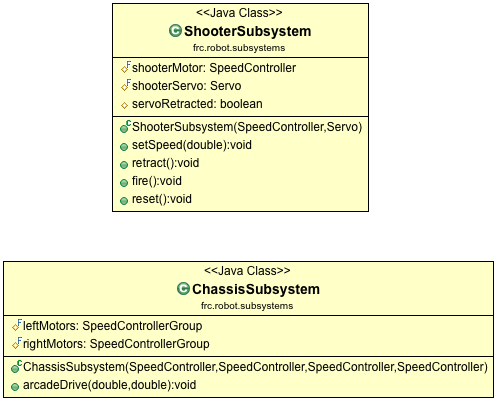
Mostly we’re going to work on testing the ShooterSubsystem. The shooter has two components: a motor attached to a spinner wheel and an arm attached to a servo that manipulates the ball. To shoot a ball we will:
- Retract the servo arm so we can pick up a ball.
- Start the shooter wheel spinning.
- Extend the servo arm so the ball is pushed into the wheel. The ball will go flying.
- Reset the system. The wheel will be stopped and the servo retracted.
(Shooter Picture)
Here’s the code for the shooter subsystem:
package frc.robot.subsystems;

import static frc.robot.Constants.*;
import edu.wpi.first.wpilibj.Servo;
import edu.wpi.first.wpilibj.SpeedController;
import edu.wpi.first.wpilibj.experimental.command.*;

public class ShooterSubsystem extends SendableSubsystemBase {

    protected final SpeedController shooterMotor;
    protected final Servo shooterServo;
    protected boolean servoRetracted = true;

    public ShooterSubsystem(SpeedController motor, Servo servo) {
        shooterMotor = motor;
        shooterServo = servo;
    }

    public void setSpeed(double speed) {
        shooterMotor.set(speed);
    }

    public void retract() {
        shooterServo.set(SHOOTER_SERVO_MIN);
        servoRetracted = true;
    }

    public void fire() {
        shooterServo.set(SHOOTER_SERVO_MAX);
        servoRetracted = false;
    }

    public void reset() {
        setSpeed(0.0);
        retract();
    }
}
Note that the constructor takes two parameters as inputs: motor and servo. The motor and servo objects will be created elsewhere and then injected when the subsystem is constructed.
Mock testing with WPILib
The best way to do testing is with the full robot; load your code and go through a methodical test process. Too often however, we don’t have sufficient access to the robot. Maybe it hasn’t been built at all, or maybe it is shared with our teammates. How can we test the code without access to the robot? The answer is that we can test much of the logic with “mock” components. Mocks are software objects that stand in for the real classes. Instead of real motors, servos, and sensors, we’ll use mock motors, mock servos, and mock sensors.
We will use the Mockito framework to create mock SpeedControllers and mock Servos. Mockito is a professional package for creating Java mocks, defining the mock behavior and checking the results.
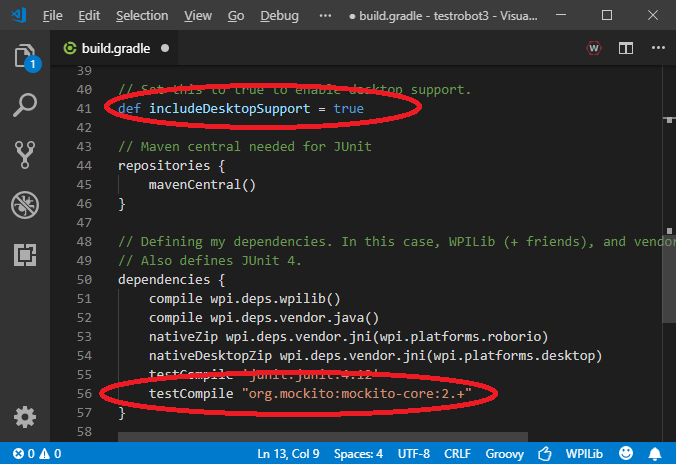
To use Mockito, you’ll need to make two simple changes to your build.gradle file.
-
- Change the value of the includeDesktopSupport variable to true.
- Add the following line into the dependencies section: testCompile"org.mockito:mockito-core:2.+" .
A simple unit test
Add a “test” directory under “src” for your java unit tests. Right-click on “src”, select “New Folder” and enter “test/java/frc/robot/subsystems”. Right-click on “subsystems” and select “create an empty class” named “ShooterSubsystemTest.java”
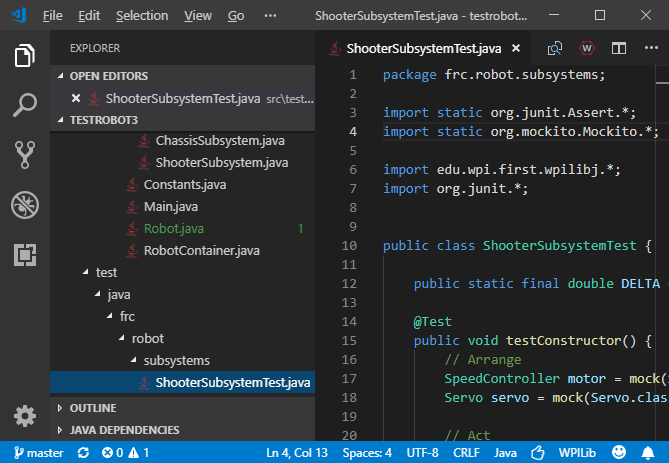
Now we can create a test of the subsystem’s constructor:
package frc.robot.subsystems;

import static org.junit.Assert.*;
import static org.mockito.Mockito.*;
import edu.wpi.first.wpilibj.*;
import org.junit.*;

public class ShooterSubsystemTest {

    @Test
    public void testConstructor() {
       // Arrange
        SpeedController motor = mock(SpeedController.class);
        Servo servo = mock(Servo.class);

        // Act
        ShooterSubsystem shooter = new ShooterSubsystem(motor, servo);

        // Assert
        assertEquals(true, shooter.servoRetracted);

    }
}
In this test we first create mock objects for the motor and the servo. The action we are testing is just to create the shooter object. After performing the action, we verify that the servo is retracted.
Note that the test is broken into sections. The Arrange / Act / Assert breakdown is a common pattern for designing tests. Sometimes we’ll add some extra sections, but most tests will have the basic three parts.
You could argue that this test is a little superficial, and you’d be right. However, this test does serve a purpose. If at some later date someone changed the subsystem so it didn’t initially retract the server, then this test would fail. We would then need to decide whether the code or the test has become incorrect.
Another unit test
Next let’s write a test for the setSpeed method. This method sets the speed of the motor. After it has been executed, the motor controller will have a different speed:
@Test
public void testSetSpeed() {
    // Arrange
    SpeedController motor = mock(SpeedController.class);
    Servo servo = mock(Servo.class);
    ShooterSubsystem shooter = new ShooterSubsystem(motor, servo);

    when(motor.get()).thenReturn(0.5);

    // Act
    shooter.setSpeed(0.5);

    // Assert
    assertEquals(0.5, shooter.shooterMotor.get(), 0.001);
}
First we set up the mock objects and the shooter subsystem. This time we tweak the mock motor a little, specifying that when we get the motor’s speed, then it will return 0.5. The action is to set the speed. Afterwards we check that the speed was really set (and specifying a margin of error of 0.001).
As your tests get more sophisticated, you’ll use the “when” method to add more mock behavior to your mock objects.
The code above is another fairly superficial test, but it does exercise the code and the mock objects. Let’s consider more features of the mock framework:
Yet another unit test
Let’s test the “reset” method of our subsystem. In this case we want to verify that the motor has really been stopped and the servo arm has been retracted.
@Test
public void testReset() {
    // Arrange
    SpeedController motor = mock(SpeedController.class);
    Servo servo = mock(Servo.class);
    ShooterSubsystem shooter = new ShooterSubsystem(motor, servo);

    // Act
    shooter.reset();

    // Assert
    assertEquals(true, shooter.servoRetracted);
    verify(motor).set(0.0);
    verify(servo).set(SHOOTER_SERVO_MIN);
}
This time there are more lines of code in the “Assert” section. Besides verifying that the server arm was retracted, we also run two verifications on the mock objects.
The “when” and “verify” features of mock objects are allow some sophisticated tests. You may see your tests growing with many fiddly mock behaviors. This is usually OK. Just make your tests as simple as possible, but no simpler.
Dependency injection
Our ShooterSubsystem depends on two objects created elsewhere, a servo and a motor speed controller. Those dependent objects are specified in our subsystems constructor. This pattern is called Dependency Injection. The tests described above wouldn’t be possible if we weren’t able to inject mock objects into our system-under-test.
Dependency Injection is an important concept within software engineering. Besides encouraging testability, it supports the concept of Separation of Concerns. This means that we often break a large program into sections that each handle different concerns. In this case we have one class that handles creation and definition of physical components (typically a RobotMap or RobotTemplate class) and another class that defines the behavior and interaction between those components (our subsystem).
