IntelliJ is a sophisticated professional development environment for Java. It is produced by the Jetbrains company, which also produces Android Studio, CLion for C++ development, and PyCharm for Python. Although IntelliJ is a commercial product, there is Community Edition that is free to use.
FRC robot programs will be built using GradleRIO, which can execute from inside any development environment, including IntelliJ.
Step 0: Install prerequisites
You must install Java. Even if you will be developing in C++, you’ll need Java installed to run IntelliJ and GradleRIO. You should define your JAVA_HOME environment variable to point to your JDK installation. Often setting JAVA_HOME is considered optional, but I have seen many strange situations resolved after this variable has been properly set.
You should obtain and run the WPILib one-step installer (available at the beginning of the 2019 season). Even if you’ll be developing with IntelliJ, you’re likely to need the tools and project templates included in this package.
It is highly recommended (though not strictly required) that you also install git, instructions for which are at: https://git-scm.com/ .
Step 1: Download and install IntelliJ
IntelliJ is available for Windows, Macintosh, and Linux. Download the installer from https://www.jetbrains.com/idea/download. Select download on the “Community” version.

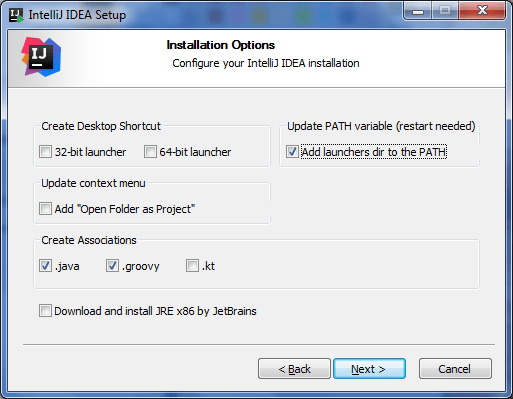
Run the installer, if possible as the Administrator. After installation, you’ll probably have to reboot your machine.
The first time you start IntelliJ, it will go through setup dialogs. You can safely take all the default options.
IntelliJ is a big, sophisticated program, but it’s pretty user friendly. Text editors will appear in the center of the window. The tabs on the edges of the windows open up “tool windows” on the sides.
 To get you started:
- The Project tool window lists all the files in your project. Double-click on them to pop up an editor.
- The Structure tool window summarizes the contents of the file you are editing. Double-click on anything to navigate to that item.
- The Gradle tool window lists all the tasks that can be executed when building your project. Double-click to execute.
Step 2: Build a simple project
Creating complete robot programs in IntelliJ is a lesson I’ll defer to another tutorial. For now, you can download an existing project and verify that IntelliJ can build robot programs.
- If you start with the startup dialog, Select “Check out from Version Control” . If you are already in the IntelliJ window, select File > New > Project from Version Control > Git. Give the URL value of: https://github.com/firebears-frc/testrobot0.git and then hit the Clone button.
- Open the “Project” tool window on the left of the screen. Expand the testrobot0 project to see all the files. Right-click on the build.gradle file to get a popup menu. Select the “Import Gradle project” item, which will likely be the last item on the list.
- Importing will take another minute. After this “Gradle” tool window will become available on the right side of the window.
- When importing is done, you should also see testrobot0 in your Gradle tool window. Open this item and then open “build”. Double-click on the “assemble” task. This should successfully compile the program.
- Under embeddedtools, double-click on the “deploy” task to deploy the program to your robot. This will fail if you aren’t connected to a roboRIO. But, no harm will have been done.
