Eclipse is a sophisticated professional development environment for Java, C++, and other languages. Eclipse was the officially supported development environment for FRC for the 2015 through 2018 seasons. In 2019, WPILib has shifted their focus to developing in Visual Studio Code, but you’ll find that Eclipse is still an excellent platform for FRC development.
FRC robot programs will be built using GradleRIO, which can execute from inside any development environment.
Step 0: Install prerequisites
You must install Java. Even if you will be developing in C++, you’ll need Java installed to run Eclipse and GradleRIO. You should define your JAVA_HOME environment variable to point to your JDK installation. Often setting JAVA_HOME is considered optional, but I have seen many strange situations resolved after this variable has been properly set.
You should obtain and run the WPILib one-step installer (available at the beginning of the 2019 season). Even if you’ll be developing with Eclipse, you’re likely to need the tools and project templates included in this package.
It is recommended (though not strictly required) that you also install git, instructions for which are at: https://git-scm.com/ .
Step 1: Download and install Eclipse
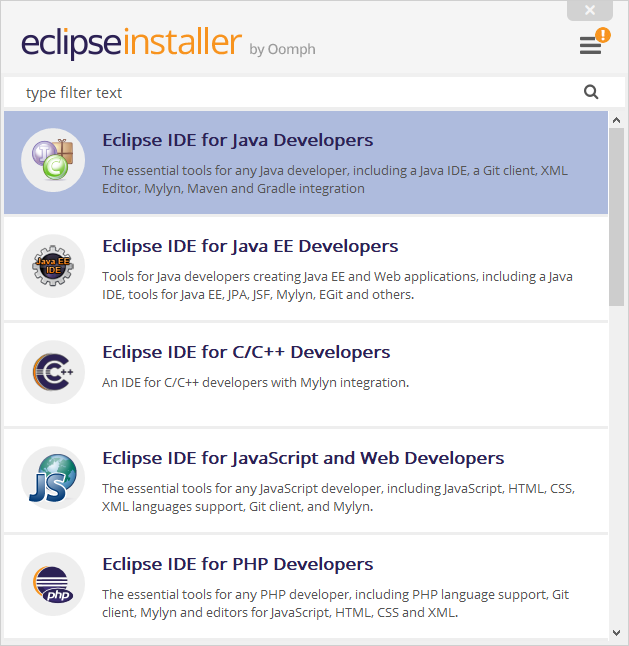
Eclipse is available for Windows, Macintosh, and Linux. Download the installer from https://www.eclipse.org/downloads . As of this writing, the latest version of Eclipse is called Photon. If possible, run the installer as Administrator. The installer will offer you several versions of the program. Pick either “Eclipse IDE for Java Developers” or “Eclipse IDE for C/C++ developers”.
Eclipse is a big program, and you should consider looking at the online documentation. Here are a few concepts to get you started:
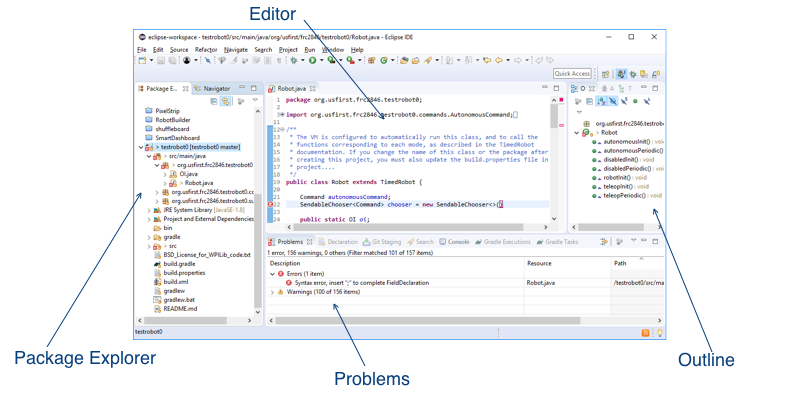
- There are a lot of things going on in the main Eclipse window. Editors appear in the middle of the window. This is where you modify code. The tabbed panels surrounding the editors are called Views. Views give you information about your whole project and allow you perform important actions, such as build and deploy code. There are more views available than are currently displayed, and you can add them from the Window > Show View menu.
For now, important views to know about include:- The Package Explorer view on the left side shows all available projects. From here you can open projects and then drill down to find files which can then be edited.
- The Outline view on the right side shows a table of contents of any file you are editing.
- The Problems view on the bottom shows things that are wrong with your code. If there is a compile error in the code, you will see it here.
- The Preferences dialog allows you to change some Eclipse configurations. On Macintoshes this can be opened from the Eclipse menu. On all other computers it is under the Windows menu.
Also, right-clicking on any project within the Package Explorer view will let you open the Properties dialog for that project. The project Properties dialog lets you reconfigure the project. - You can extend the functionality of Eclipse by adding plugins. Plugins are managed from the Help menu, starting with the menu items for “Install New Software…” and “Eclipse Marketplace…”
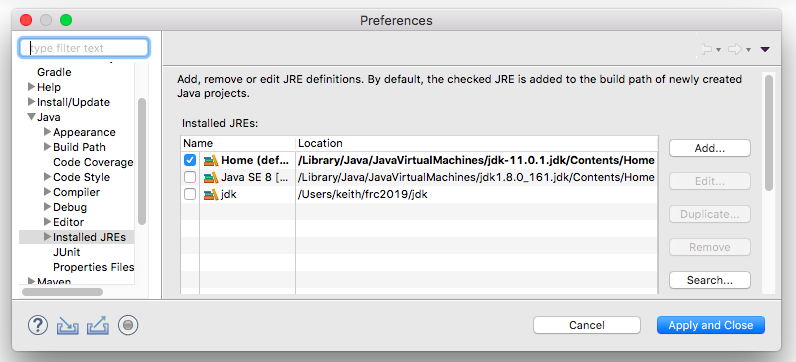
Once Eclipse starts up, you should verify that it will be using your preferred Java installation. Open the Preferences dialog and then click on “Java” and then “Installed JREs”. Make sure that your preferred JDK installation is present and is checked.
Step 2: Install the Gradle plugin
Now we’ll want to install a plugin to Eclipse that makes it easier to build and deploy your robot programs. Click on the Help menu and select “Eclipse Marketplace…” In the dialog’s find box, type “Buildship Gradle”. Click the Install button for the Gradle plugin. Eclipse will need to restart to complete installation.

After the restart, open the Eclipse Preferences dialog and click on the “Gradle” item. Make sure that “Gradle wrapper” is selected. Apply and close.
Click on the Window menu and select “Show View…” and “Other…”. Find the “Gradle” item and select “Gradle Tasks”. The Gradle Tasks view is where you will build and deploy your robot programs.
Step 3: Build a simple project
Creating new robot programs in Eclipse is a lesson I’ll defer to another tutorial. For now, you can download an existing project and verify that Eclipse can build robot programs.
- Go to https://github.com/firebears-frc/testrobot0/releases/ and download testrobot0.zip . Uncompress this ZIP file onto your laptop, probably in your Documents folder.
- From the File menu, select Import…
- In the Import dialog select General and then Existing Projects. Select your new testrobot0 directory as the root. Hit the Finish button. This will create a new testrobot0 project in your Package Explorer.
- You should also see testrobot0 in your Gradle Tasks view. Open this item and then open “build”. Double-click on the “assemble” task. This should successfully compile the program.
- Under embeddedtools, double-click on the “deploy” task to deploy the program to your robot. This will fail if you aren’t connected to a roboRIO. But, no harm will have been done.

One thought on “Installing Eclipse”