Shuffleboard is a customizable dashboard that provides amazing visibility into your robot. You can set up many graphical widgets on the Shuffleboard window, each of which displays information from the robot. For instance you can create widgets for current motor speeds, air pressure, or the output of sensors. The Shufflebord window can have multiple tabs to organize the widgets.
You can use Shuffleboard to provide real-time information while driving in a competition, but it’s also very useful while developing and testing your hardware and software. It can definitely help you out when you’re trying to answer questions like “Are the actuators and sensors working correctly?” or “Why doesn’t it behave the same as it did yesterday?” or generally “What’s really going on inside the robot?”
There are at least three ways to start up this tool. Within the driver station software, you can specify Shuffleboard as your “Dashboard Type”, which will cause shuffleboard to start up when you start the driver station. You can also start it from the Visual Studio Code Command Palette with the command “WPILib: Start Tool”. A third way to start it up is to start the program directly from the “tools” directory in your FRC install. (e.g. C:\Users\Public\frc2019\tools).
The default configuration for Shuffleboard has two tabs listed at the top: SmartDashboard and Livewindow.
The SmartDashboard Tab
First, a bit of history: SmartDashboard is a dashboard similar to Shuffleboard, but it is older and has fewer features. Shuffleboard expands on the programming interface for this older program. Many of the programming examples that come with WPILib will contain code that sets up widgets on SmartDashboard. In the same way, these calls will create widgets in Shuffleboard.
The SmartDashboard tab is the default destination for custom widgets created within your robot program.
The widgets you can add to this tab fall into two categories: raw data and Sendable objects.
Raw Data Widgets
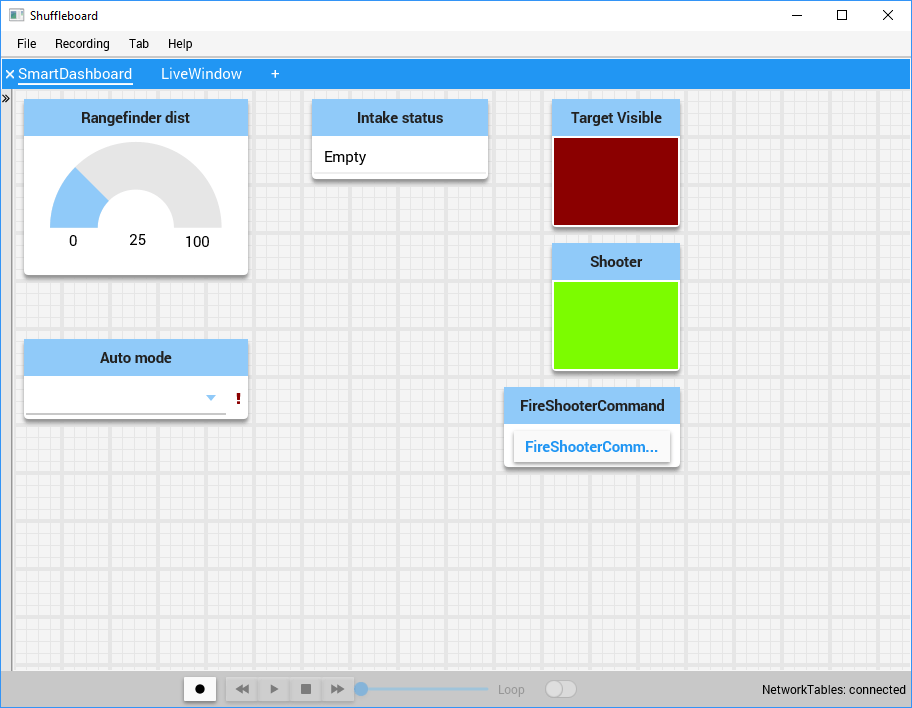
You can display numeric, boolean, or text values directly to Shuffleboard.
SmartDashboard.putNumber("Rangefinder dist", rangeFinder.getRangeInches());
SmartDashboard.putBoolean("Shooter", shooter.readyToFire());
SmartDashboard.putBoolean("Target visible", visionSystem.onTarget());
SmartDashboard.putString("Intake status", intake.getStatus());
The four widgets created above will not update automatically. You must put out the values again when you want them to change. You can update them in a periodic function, such as by putting the rangefinder line into your robot’s robotPeriodic() method or a subsystem’s periodic() method. Or, you can change them as needed. For instance, you might use a periodic method up update the rangefinder distance every 20 milliseconds. On the other hand your Intake subsystem might contain code that updates its dashboard status when the status actually changes.
Once the widgets show up on the Shuffleboard you can modify their format type. For instance, a boolean widget can be text or a colored box. A number widget can be just text or it could be a dial or graph.
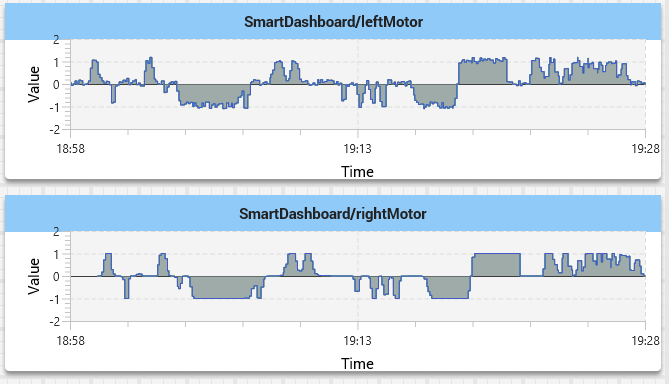
The graph format can be especially when debugging. Imagine two graphs representing two drivetrain motors; you could compare the two graphs when considering if the motors are getting correct signals.
In general, raw data lets you answer basic debugging questions about the status of robot components.
Sendable Data Widgets
Many WPILib objects implement the “Sendable” interface, which allow those objects to communicate over the Shuffleboard’s network table interface. Most motors, actuators, and sensors are sendable.
SmartDashboard.putData(leftMotor);
SmartDashboard.putData(rangeFinder1);
SmartDashboard.putData(rangeFinder2);
SmartDashboard.putData(grabberSolenoid);
The magic of sendable objects is that they update their data automatically. You only need to call the above lines once, such as in your robot’s robotInit() method or in a subsystem’s constructor.
The visual format of each sendable widget is specific to its object. For instance, the motor’s widget is a number slider that tells the current output of the motor. For some debugging scenarios, you might be better off sending the motor output as raw data, so you can view it as a graph.
Note that you can optionally add a name value to the widget:
SmartDashboard.putData("Forward rangefinder", rangeFinder1);
SmartDashboard.putData("Backwards rangefinder", rangeFinder2);
More objects are sendable than you might expect. For instance all Commands are sendable and create a button widget that lets you trigger the command. Subsystems are sendable and create a widget that tells you which Commands are currently running on them.
SmartDashboard.putData(Robot.driveTrain);
SmartDashboard.putData("Fire Shooter", new FireShooterCommand());
SmartDashboard.putData("Turn 90 Degrees", new TurnCommand(90));
SmartDashboard.putData(Scheduler.getInstance());
The LiveWindow Tab
LiveWindow shows each subsystem and the child components within them. In teleop and autonomous modes the LiveWindow shows what the components are doing. However, if you enable Test mode on the driver station, this tab will come alive and allow you to manipulate the components. This allows you to test (and debug) robot components without writing any special code. Does your newly installed motor really work? Enable test mode and you can run it at any speed.

LiveWindow comes for free; no code changes are necessary to create it. However, to get the best value out of this tool, you should let the dashboard know which components are children of which subsystems.
If you are creating your components within the subsystem code, you can designate the child status with addChild() calls. Note that the first argument to addChild is the text name for the component. If you do not give a name, the LiveWindow will give you default names like “Spark[3]”.
public DriveTrain() {
    leftMotor = new Spark(0);
    addChild("Left", leftMotor);
    leftMotor.setInverted(false);
    rightMotor = new Spark(1);
    addChild("Right", rightMotor);
    rightMotor.setInverted(false);
    rangeFinder = new Ultrasonic(2, 3);
    addChild("rangeFinder", rangeFinder);
}
If you are creating your components elsewhere, such as in a RobotMap class, you can still designate the child-relationship by giving the component a name and subsystem name:
intakeMotor=new Spark(3);
intakeMotor.setName("Intake", "intakeMotor");
Another absolutely genius feature of LiveWindow is that it lets you configure PID subsystems in real time. Configuring PID without this feature involves a lot of trial and error, mixed with constant recompile cycles. With LiveWindow you can dial it in in real time, and then copy the chosen parameters back into your code.
Setting up a Custom Debug Tab
The primary users for Shuffleboard are the robot drivers. At the beginning of a match, the drivers will fire up their driver station and they will want to see only the widgets that assist them. Programmers are secondary users of Shuffleboard, so we shouldn’t clutter up the main Shuffleboard screen with our diagnostic widgets. For this reason, we may shift our widgets off to secondary tabs, or we may configure them to go away when we aren’t debugging.
You can write code that sets up new tabs and positions widgets within them.
Consider that the widgets described above look like long-term decisions. You set them up and assume that you will always need them. When debugging, we often create temporary code just for the purpose of answering certain questions. You could create temporary code for widgets, but they may pop up and get in the way of your permanent widgets. It would be nice to have a designated spot to put the temporary stuff.
A neat way to address this need is to programmatically create a “Debug” tab where all your temporary widgets. Custom tabs can be created in your code:
ShuffleboardTab debugTab = Shuffleboard.getTab("Debug");
Widgets can then be added to the tab with a name (e.g. “Vision Dist”) and a default value. The “withWidget” method declares the widget’s format type. Number widgets can be of type “Number Bar”, “Number Slider”, “Graph”, “Voltage View” or “Text View”. Boolean widgets can be of type “Boolean Box”, “Toggle Button”, “Toggle Switch”, or “Text View”. String widgets can only be “Text View”.
 NetworkTableEntry visionDistWidget = debugTab
        .add("Vision Dist", 0.0)
        .withWidget("Graph")
        .getEntry();
Values can then be set into the widgets like this:
visionDistWidget.setNumber(vision.getTargetDistance());
Values can be set throughout your code:

Note that in this example, we set up all our widgets in the Robot class. A better pattern might be to create the debugTab variable in the Robot class, but then create the debug widgets inside the subsystems and commands.
The above code will generate widgets on a custom tab on the Shuffleboard window:

