Debugging is the process of figuring out why software isn’t doing what it should, and then fixing it so it behaves better.
Computer programmers always spend more time debugging code than they do writing it in first place. It is important to build up your skills in debugging code, whether the problem is in your own software or in code written by others.
Strangely, there isn’t a lot of literature available on this subject, and practically no formal education on debugging software. There should be more study and more formal methodologies. At least, all programmers should know the general techniques used by others and should learn the tools that are available.
Formalizing the questions
Sometimes debugging is easy. You see the problem immediately, or after a minute’s thought. However, if the problem has taken more than a couple minute’s consideration, you should start to specify the questions you need answers to. Often it helps to actually write these questions. Really. Write down the questions as if you you’re posing them to some third party.
Typical questions are:
- Exactly how do I reproduce this problem? What is the negative scenario (where the problem occurs) and what is a positive scenario (where there is no problem)
- Where was the program executing when things went wrong? How far into the program did we get? In what routine did the problem occur, and what was the path to get to that routine? Did the Command I’m working on even execute?
- What is the state of the data at the time of the problem? What does the data look like in positive scenarios? Why isn’t my Command ever finished? What are the input and output values on my PID controller?
Debugging with print statements
The oldest and most common tool for debugging is to put temporary “print” statements into the code. You can print out variable values so you know the state of the data. Sometimes you just print little messages telling you where the program was executing, so you get a better idea of where the problem occurred.
A print statement in Java looks like this:
System.out.println("motor speed is " + motor.get());
When this statement executes, the text will print out on VS Code’s RioLog window and also on the Driver Station’s console window. The printed text will also be available in the Driver Station’s Log File Viewer. For basic debugging, the console may prove more useful than the Log File Viewer.
Print statements help answer questions like “Did a specific routine even execute” or “How did the motor speed vary during autonomous”.
Exceptions and Stack traces
When something goes seriously wrong in a Java program, the program may communicate this to other parts of the program by “throwing an exception”. When an exception occurs, the program breaks out of the routine it is running and passes the exception to the routine that called it. The exception is then propagated up the calling stack until one of the routines can handle it. Handling the exception is called “catching” the exception.
When an exception is thrown, the program often prints out a “stack trace” to the console, which will show where the error occurred. There is an example stack trace:
ERROR 1 Unhandled exception: java.lang.NullPointerException org.firebears.betaTestRobot2.subsystems.Board.setMotor2(Board.java:82)
Error at org.firebears.betaTestRobot2.subsystems.Board.setMotor2(Board.java:82):
Unhandled exception: java.lang.NullPointerException
  at org.firebears.betaTestRobot2.subsystems.Board.setMotor2(Board.java:82)
  at org.firebears.betaTestRobot2.commands.AutonomousCommand.execute(AutonomousCommand.java:29)
  at edu.wpi.first.wpilibj.command.Command.run(Command.java:292)
  at edu.wpi.first.wpilibj.command.Scheduler.run(Scheduler.java:224)
  at org.firebears.betaTestRobot2.Robot.autonomousPeriodic(Robot.java:118)
  at edu.wpi.first.wpilibj.IterativeRobotBase.loopFunc(IterativeRobotBase.java:225)
  at edu.wpi.first.wpilibj.TimedRobot.startCompetition(TimedRobot.java:81)
  at edu.wpi.first.wpilibj.RobotBase.startRobot(RobotBase.java:261)
  at org.firebears.betaTestRobot2.Main.main(Main.java:20)
Warning 1 Robots should not quit, but yours did! edu.wpi.first.wpilibj.RobotBase.startRobot(RobotBase.java:272)
Warning at edu.wpi.first.wpilibj.RobotBase.startRobot(RobotBase.java:272): Robots should not quit, but yours did!
ERROR 1 The startCompetition() method (or methods called by it) should have handled the exception above.
The above stack trace shows that an unexpected null value was encountered when the AutonomousCommand tried to set a motor value.
A stack trace is kind of a good news / bad news situation. On one hand, you have a serious problem that shuts down processing. On the other hand, you know generally what went wrong and exactly where it happened.
Learn to read stack traces and use them in your debugging. Understand what the exception types are and how to interpret the calling stack.
Logging
The print statements described above are temporary changes to the program. You should delete them after they have served their purpose.
Logging is a more formal process of printing out program state and execution. If you identify things you want to monitor, you can leave the logging statements in your code, and then selectively turn on the ones you want to print. Logs let you answer questions like “How often did our pneumatics fire?” or “What command was running just before we experienced a brownout?” or “Which autonomous program executed and what happened during that command?”
You can log items of different levels of importance. Java supports seven levels of log severity, in this order:
- SEVERE – serious failures
- WARNING – potential problems
- INFO – informational messages
- CONFIG – configuration change messages
- FINE – detailed debugging and tracing messages
- FINER – more detailed debugging messages
- FINEST – highly detailed debugging messages
Before you can do any logging, you must first create a Logger variable in each Java class:
private final Logger logger = Logger.getLogger(this.getClass().getName());
To actually create logs, call methods on the logger variable:
logger.fine("vision target acquired: angle=" + a + " : dist=" + d);

logger.config("PID controller values: " + p + "," + i+ "," + d);

logger.info("starting AutonomousCommand3 : gameData=" + gameData);

logger.warning("Air pressure is only " + pressure + " psi");
If you catch and handle an exception, you may want to log the problem, even if you’ve taken care of it. The proper form is to add the exception to the log statement. The following code will log a warning message, accompanied by the stack trace:
} catch (IOException e) {
    logger.log(Level.WARNING, "Failed to open connection", e);
}
Make good decisions about what to log. Don’t get carried way. Too many logs might create performance problems. Too many logs make it harder to find what you’re interested in.
Logged data will show up on the driver station Console and also within the Log Viewer. For long term monitoring, the Log Viewer becomes extremely useful. The Log Viewer can be used to reconstruct what happened during match. Having some well chosen log statements may help you reconstruct what commands executed at what times, and what were the critical values of air pressure, elevator height, or motor speed.
Configuring your Loggers
Logging can be reconfigured to print out different things for different scenarios. For instance, you may decide that only messages of level INFO or higher get printed. Later you can easily switch the level down to FINE, which will cause all the CONFIG and FINE messages to also print. You can also specify different levels for different Java packages. For instance, you may want the default log level to be CONFIG, but the autonomous commands log at the FINE level. These levels are easy to set and easy to change later.
To configure your logging, create a file called “logging.properties” in your “deploy” directory:
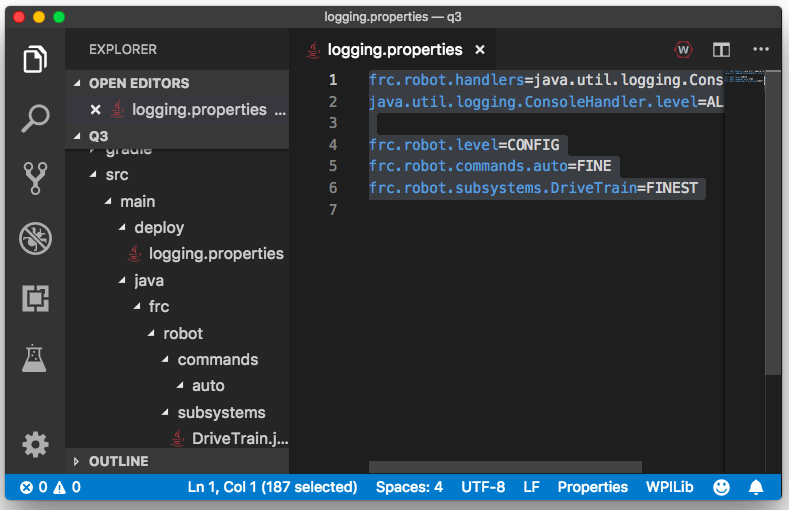
Here’s the content of our sample file:
frc.robot.handlers=java.util.logging.ConsoleHandler
java.util.logging.ConsoleHandler.level=ALL

frc.robot.level=CONFIG
frc.robot.commands.auto=FINE
frc.robot.subsystems.DriveTrain=FINEST
The first two lines just cause all messages in your project to be printed out to the console. Line 4 sets the default logging level to CONFIG or higher for all loggers under the frc.robot package. Line 5 causes all logging in the frc.robot.commands.auto package to log at the FINE level. Line 6 sets the logging level of the DriveTrain subsystem to be FINEST.
To tell Java where your logging config file is, you must add one line to your build.gradle file. You must add one jvmArg to the deploy / artifacts / frcJavaArtifact section:
frcJavaArtifact('frcJava') {
    targets << "roborio"
    jvmArgs = [ '-Djava.util.logging.config.file=/home/lvuser/deploy/logging.properties' ]
    // Debug can be overridden by command line, for use with VSCode
    debug = getDebugOrDefault(false)
}
Configuration specific behavior
Occasionally, you may need to do a little special processing that depends on the logging configuration. Most of the time this is a bad idea, because logging should not change the behavior of your code. On the rare occasions when this is necessary, you can detect the logging level as follows:
if (logger.isLoggable(Level.FINE)) {
    doubled=lidar.getDistance();
    logger.fine("Lidar distance = "+ d);
}
