Note that the following document was written while we were still in the 2019 alpha test of WPILib. When the 2019 software is officially released, it will include a one-step installer that sets up almost everything into a single frc2019 directory, including a copy of Java version 11. This document is still good information, especially if you intend to use more than the standard VS Code environment. If you intend to use VS Code, it is recommended that you:
- Use the official installer.
- Set your JAVA_HOME environment variable to the frc2019/jdk directory, as explained below.
- Install git, as explained below.
If you intend to program your robot in Java, you will need to install version 11 of the Java Development Kit onto your computer.
Actually, the first step might be to see if you already have Java installed. Pull up a command window (the CMD program for windows or the terminal program on a Mac) and type the command
java -version

If your terminal responds with a version of 11 or more, you might already be set. Or, you might want to install the latest version, as described below.
Installing Java is really easy. Let’s see how complicated I can make it.
Step 1: Downloading and Installing the JDK
You’ll want the JDK download for the latest version of Java SE 11 (which at the time of this writing was Java SE 11.0.1).
You can download Java at http://java.oracle.com. This page changes occasionally, but you should click into the download section for “Java SE”. From the “Java SE Downloads” page, look for the Java SE 11 section and click on the Oracle JDK download link.
Note that Java comes in two main distributions: the JRE and the JDK. The Java Runtime Environment (JRE) contains only the software to run Java programs. The Java Development Kit extends the JRE to also let you compile new programs. For our purposes, you always need the JDK. Sometimes you’ll find a computer that has both the JRE and JDK installed. This is perfectly OK, as long as your environment is configured to use the JDK installation.
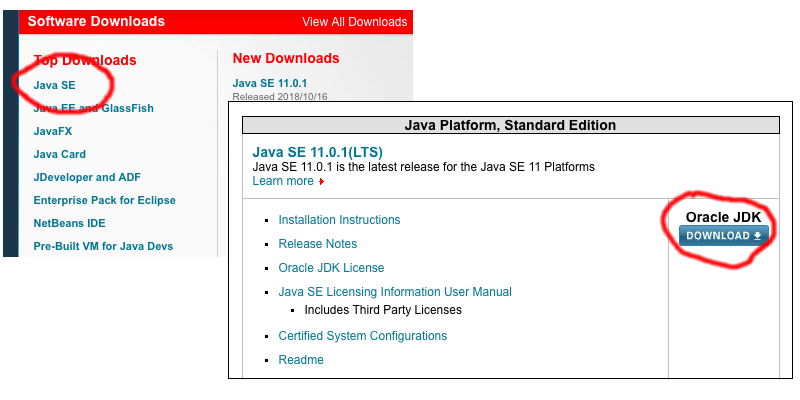
From the JDK 1 Downloads page, accept the license agreement and then download the installer for your operating system.
Windows
There will be two choices for Windows installs, labeled “x86” and “x64”. You almost certainly want the “x64” version, since the other version is for older 32-bit machines.
Download the installer and run it. If possible, run the installer as the Administrator user. After everything is done, you should see your new Java install under the C:/Program Files/Java directory.
Macintosh
Select the “osx” installer in the “dmg” format. Download and run. Afterwards, you’ll see the installation under the /Library/Java/JavaVirtualMachines/ directory.
Linux
If you’re running Ubuntu or a similar Debian based linux, try executing:
sudo apt-get install openjdk-11-jre openjdk-11-jdk
For Ubuntu, the java installation will end up in /usr/lib/jvm/jdk-11.
For Fedora based Linux distributions, Oracle provides RPM packages. You’ll probably want the “linux-x64.rpm” version, unless you have an old 32-bit machine.
Step 2: Setting your JAVA_HOME environment variable
Now that Java is installed, we must tell our software where to find it. We’ll want to put that directory path into a JAVA_HOME directory.
For all operating systems, the Java home directory will be the directory containing Java’s “bin”, “jre”, and “lib” subdirectories.
Windows
Open up a File Explorer window and select the C drive. Click into Program Files and then click into the Java directory. Click into a directory named like your new JDK version.
Now click on the file path area and copy the text of the file path into the clipboard. A typical Java home directory on Windows might be C:\Program Files\Java\jdk-11 :

Next, open the Control Panel. In the search box, type the words “environment variables”. Click into the link for “Edit System Environment Variables”, which will pop up the System Properties dialog. Click on “Environment Variables”.
Create a new System Environment Variable named JAVA_HOME, and paste in the value you just copied.

Next, click on the User Environment variable named “Path” and edit it. Change it so the first thing in the Path variable is “%JAVA_HOME%\bin” .
Close out the variable and system dialogs. Open up a CMD windows. You should now be able to execute the “java -version” command and get back the current version number.
Macintosh
You’ll need to open a terminal window for this job. Change directories to /Library/Java/JavaVirtualMachines/ . In this directory you should see a directory whose name is similar to the Java version you just downloaded. Change into that directory and then into the Contents/Home subdirectory. That should be your new Java home directory. For instance, if you installed jdk-11.0.1.jdk, then your Java home directory might be: /Library/Java/JavaVirtualMachines/jdk-11.0.1.jdk/Contents/Home

Change back to your user home directory and edit the file .bash_profile. Create this file if it doesn’t already exist. You’ll want to add the following two lines to the end of the file:
export JAVA__HOME=/Library/Java/JavaVirtualMachines/jdk-11.0.1.jdk/Contents/Home
export PATH=${JAVA_HOME}/bin:${PATH}

Open a new Terminal window and test that you can execute “java -version” and get back a response.
Linux
Setting the environment variable in Linux is about the same as on a Mac, although you should add the variable definition to the .bashrc file, rather than the .bash_profile. As above, run java -version to verify that the setup is correct.
Multiple versions of Java
You may have noticed that there are many versions of Java out there.
For the 2018 robot code, we must stick with version 8. Newer versions will not work. However, the WPILIB maintainers are committed to making all the new software work with version 11. It’s perfectly OK to have multiple versions of Java installed on one computer. Simply update the JAVA_HOME variable to point to your desired installation.
Visual Studio Code and GradleRIO will use the JAVA_HOME variable to find your desired Java installation. If you develop using Eclipse, there may be an extra step in the Preferences dialog of defining your “installed JRE”. You can then specify different JREs for different projects. If you develop in IntelliJ, you can open the Project Structure to set a specific Software Development Kit for each project.
Note that there is also an open-source version of Java called OpenJDK. This will work perfectly fine for FRC development. In fact, the roboRIO executes Java programs using the Zulu JRE, which is derived from OpenJDK. Right now, there’s not much downside to sticking with Oracle’s commercial JDK.
Install git
OK, this has nothing to do with Java. But, while you’re setting up your laptop, you might as well set up git. Even if you don’t use git, you’ll need this later.
Git is the software version control system used by WPILib and many FRC teams. For better or worse, git is the world’s most popular software configuration management system. GitHub is a FIRST sponsor. Individuals can get free GitHub accounts, and FIRST teams can get upgraded Team Accounts.
Instructions for installing git are at: https://git-scm.com . You might also take a look at: https://www.atlassian.com/git/tutorials/install-git . On Windows, do the installation as Administrator.
