So far you’ve probably been debugging Java code by adding print statements; you add code that gives you a peek into the robot’s internal state. Monitoring the robot with ShuffleBoard is similar; you add output statements to your code.
Imagine a better system that doesn’t require added code, where you could stop time, crack the roboRIO open and see what was going on inside. You could examine the variables and then watch the lines of code execute, one at at time. This technique, called Remote Debugging, is available to you from most modern Java development environments.
Remote debugging lets us answer questions like “Did my code even get executed?” or “Did the initialization code really get executed before the periodic code?” or “What were the variable values?”. Since the the debugger can let you see the actual execution, you can also verify that conditionals and loops really execute the way you expect. You can even use the debugger to alter variable values, so novel scenarios can be tested.
We call this technique “remote” debugging because it involves a network connection between your programming laptop and the roboRIO. Your robot program is executing on the RIO, but it will be controlled and monitored by the development environment on your laptop. You’ll be watching the action as if it’s happening on your screen, but the action is actually occurring remotely on your robot.
Starting the debugger is almost the same action as deploying code with GradleRIO. Execute the “debug” command instead of “deploy”:
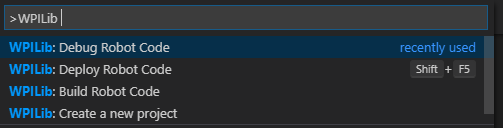
This command will build and deploy code in debug mode which will configure the RIO to communicate back to your debugger. Visual Studio Code will also switch into debug mode (as indicated by the Debug icon in the activity bar on the left edge of the window).
Breakpoints
The first important concept in remote debugging is the setting of “breakpoints” in your program. A breakpoint is a location in your program that you want to watch. When your robot’s thread of execution reaches that point, the program will freeze and your debugger will come alive.
Inline breakpoints
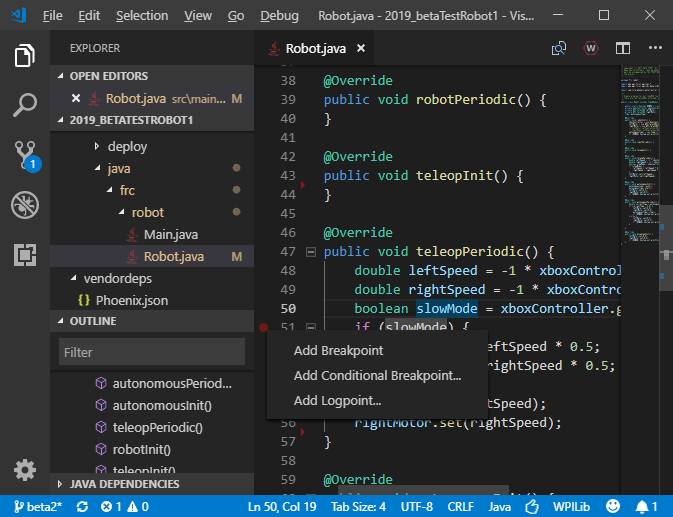
To create a breakpoint, click to the left of the line numbers in your program. Below, we’ve created a breakpoint on line 51 of the teleopPeriodic method, indicated by a little red dot:
Start the Driver Station software and enable teleop mode. The normal execution of a robot program is that the RIO will execute teleopInit once and then start executing teleopPeriodic. When the RIO reaches the breakpoint on line 51, it will pause execution as below:
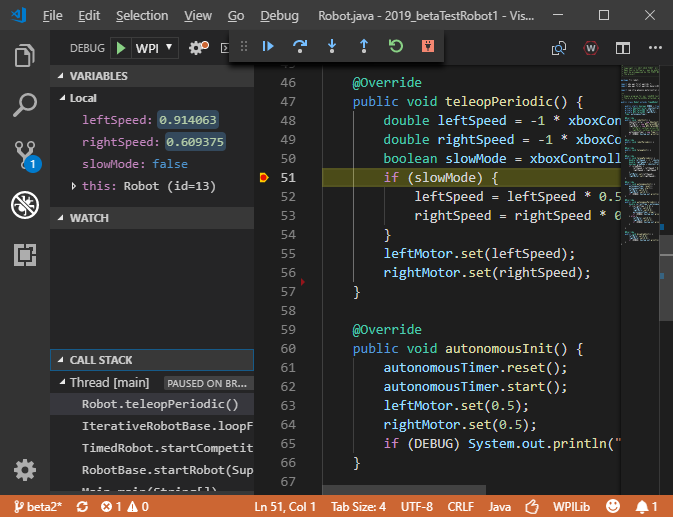
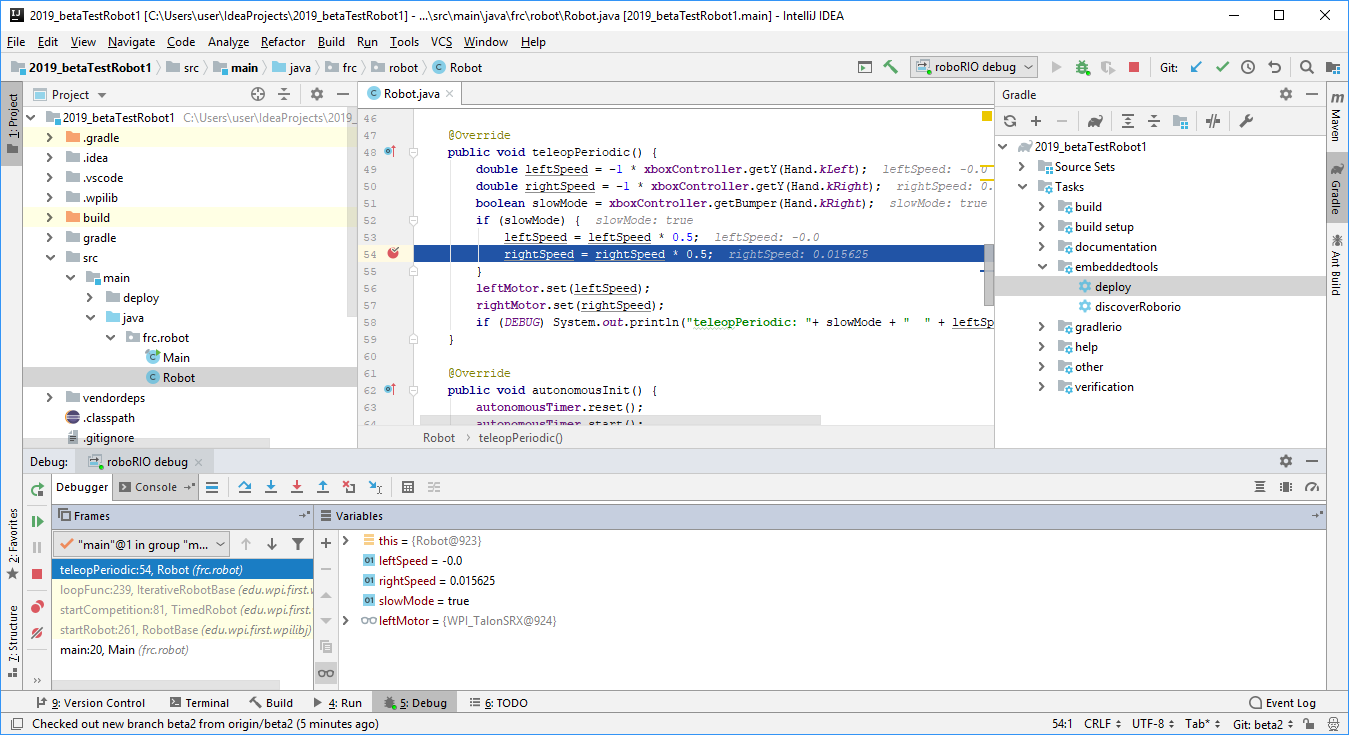
There is a lot of information going on in this window:
- In the upper left sidebar you see all the local variables of the teleopPeriodic method, There’s also the “this” variable that you can expand to see all the Robot’s instance variables.
- Below the Variables section is the Watch section, which lets you add arbitrary expressions to be evaluated.
- In the lower left of the sidebar is the Call Stack, which tells you what method called your current method, and what method called that method, etc. The call stack actually lists all the Java threads currently running on the RIO, but you may have to stretch out the window to see them all.
- Below the Call Stack, there is a list of Breakpoints. In the above illustration, you would need to collapse the call stack to see the breakpoints. You can edit or enable/disable breakpoints here.
- Above the editor window is the debug toolbar:
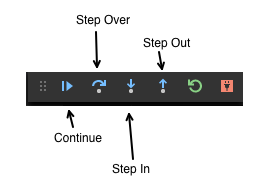
The “Continue” tool will cause program execution to resume, until it reaches the next breakpoint. The “Step Over” tool executes the next line of code. “Step in” will drill into a method. “Step out” pops out of the current method to the method in the call stack that called it. At every step, you can watch the variables change. You’ll be able to see the code go through “if” statements and loops.
Also, take a look at the “Debug” menu at the top of the window. Particularly useful in the Debug menu are options to temporarily disable all breakpoints and then later enable all breakpoints. Disabling breakpoints lets you perform normal robot operations for a while. Then you can enable breakpoints to examine specific scenarios.
Conditional breakpoints
Note that in our above example, we encounter the breakpoint every single time we execute teleopPeriodic. We could have put the breakpoint inside the “if” statement, in which case the breakpoint would stop only when the “slowMode” variable was true.
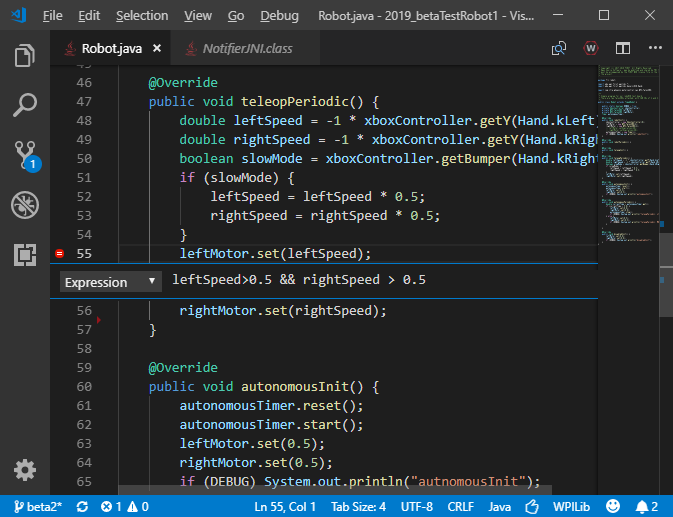
It is often useful to set “conditional” breakpoints that only fire when certain conditions arise. The conditional breakpoint is indicated by a little red dot with an equals sign in it. Create one by right-clicking to the left of the line number and specify “Add Conditional Breakpoint”.
For instance, below we have a breakpoint on line 55 that only fires when both leftSpeed and rightSpeed are greater than 0.5.
Exception breakpoints
You can also specify that the debugger stops operation when an exception is thrown. Look in the Breakpoints section at the bottom of the Debug sidebar and enable “Caught Exceptions”. Exception breakpoints can be especially useful when you’re trying to diagnose unexpected exceptions.
Note that VS Code will break on all exceptions. Other IDEs allow you to break on specific exception types.
Logpoints
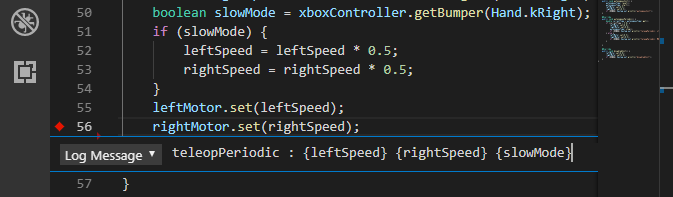
A logpoint is like a breakpoint, but it merely prints a message out to the console instead of stopping. This is like debugging with print statements, except that you can enter them in the debugger without having to recompile. Create one by right-clicking to the left of the line number and specify “Add logpoint”. Logpoints are indicated by a little red diamond.
You can cause logpoints to print out variable values by putting the variables in curly braces. Below is a logpoint that will print out three variables:
Examining program state
The Variables section of the debug sidebar will answer many of your questions about what’s going on inside your program. Spend time exploring the local and instance variables to see what’s in the objects. Familiarize yourself with the state of health programs so you can better spot error conditions.
The Variables section also allows you to change the values of variables. Just double-click on any number, boolean, or String value and you can give it a new value. This feature can let you test specific scenarios, such as “What will happen if my gyro returns a negative value?”.
If you are monitoring specific variables or variable expressions, park them in the Watch section. They will be reevaluated whenever the program stops. You can add expressions directly in the Watch section, or you can right-click on them in the code editor and select “Debug: Add to Watch”.
Debugging robot programs with Eclipse
The program on your robot is running within a Java Virtual Machine (JVM). Remote debugging is possible because JVMs contain features to support it. The mechanism for debugging is called the Java Platform Debugger Architecture (JPDA). Visual Studio Code has an extension that connects to JPDA, but so does nearly every other Java development environment. The debugging functions will be similar on other IDEs, but the user interface may be different.
Eclipse has an excellent built-in Java debugger. The user interface is different from VS Code, but (in my opinion) it makes better use of you screen space.
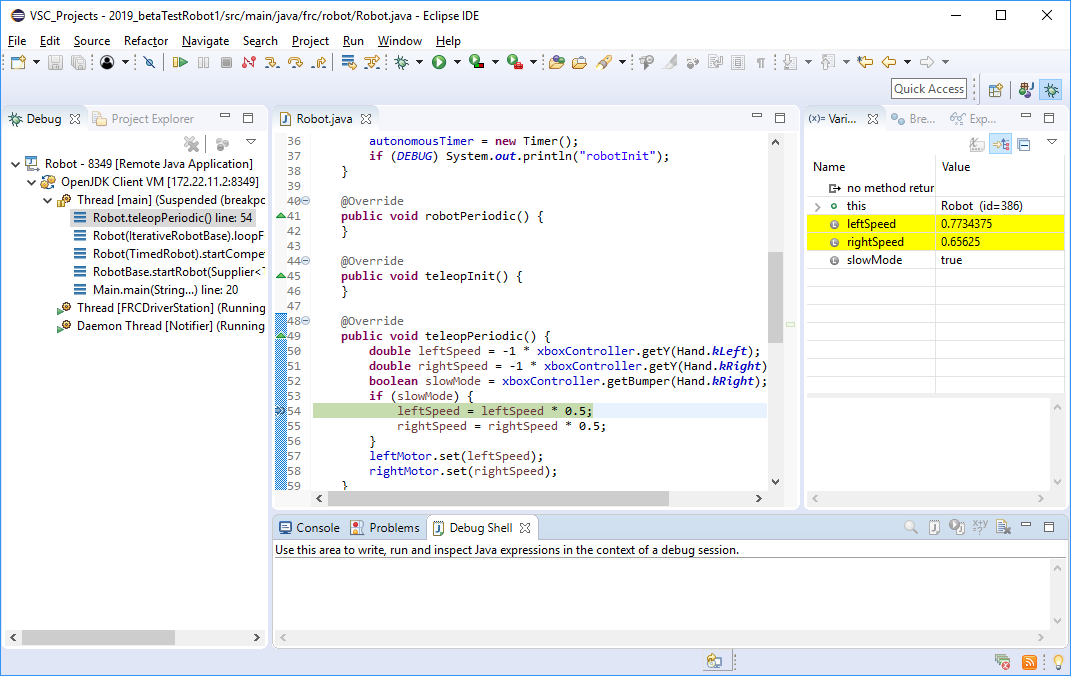
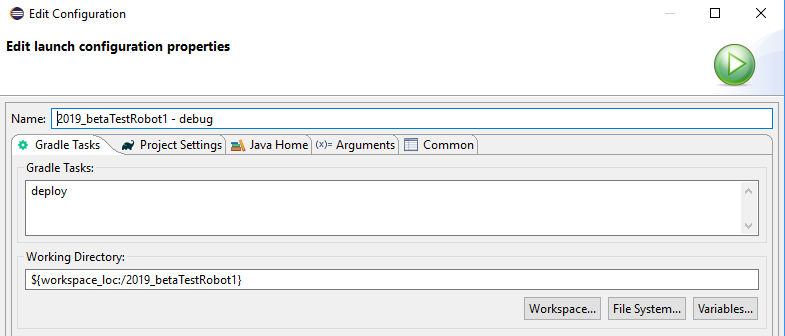
Eclipse’s Gradle plugin allows you to execute the GradleRIO deploy task. Enabling remote debugging is a slight variation on the deploy task.
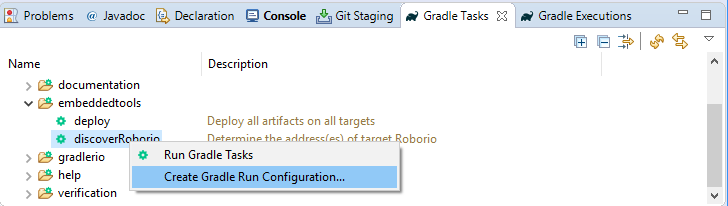
- Go to the Gradle Tasks view and find embeddedtools > deploy. Right-click on the deploy task and select “Open Gradle Run Configuration”.
- The Run Configuration dialog will pop up for the “deploy” task.
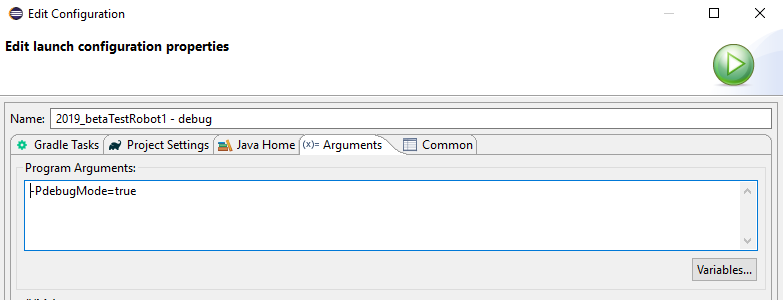
- Click on the Arguments tab and add the debugMode project property. Then hit the OK button to save.
- Next, you’ll need to set up a Remote debugging configuration. From the Run menu, select “Debug Configurations…”
In the Debug Configuration dialog, add a new entry under “Remote Java Application”.
Specify a host address that will connect to your roboRIO (either 10.te.am.2 or 172.22.11.2) and set the port number to 8349.
To do remote debugging in Eclipse, you will first deploy the code in debugMode using your new run configuration. Then, you will attach to the remote process with your new debug configuration.
Debugging robot programs with IntelliJ
IntelliJ also an excellent Java debugger. It is built-in, no extension needed. The function and user interface is similar to Eclipse.
To set up remote debugging in Intellij:
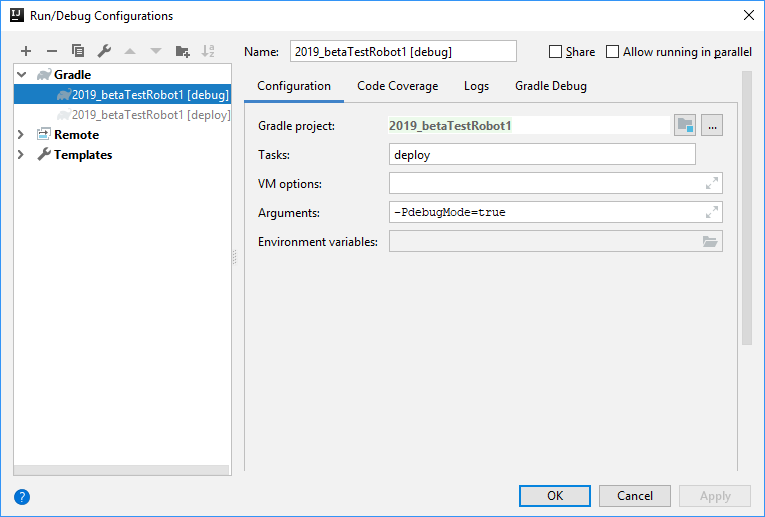
- From the Run menu, select “Edit Configurations…”
- Create a Gradle configuration with a task of “deploy” and arguments turning on the debugMode
- In the same Run/Debug Configurations dialog, create a new Remote configuration for port 8349 and for a host address that connects to your roboRIO.
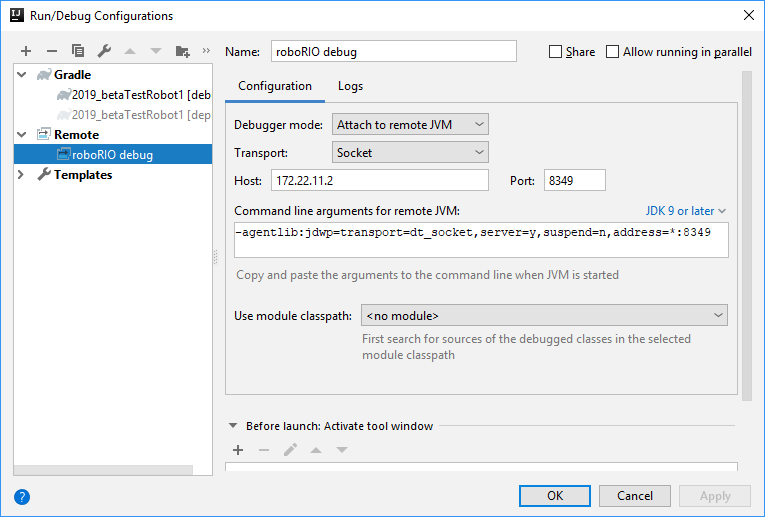
To do remote debugging in Intellij, you first deploy the code using your new deploy configuration. Then, attach to the RIO using the new Remote configuration.
When not to use the Debugger
There are times when the debugger isn’t the right tool. Robots operate in real-time, so freezing time disconnects them somewhat from real-world processing. For instance, if you are debugging while motors are moving, stopping the action will the change the physics of your situation. If you stop a command that has a timeout, the timeout may expire while you’re staring at the code, which change the robot’s behavior. If you’re investigating at problem related to real-time interactions, you may choose to set logpoints or to use printing, logging, or ShuffleBoard instead.
Overall though, I hope this exercise has sold you on the use of the debugger. It will be a tremendously useful tool for problem solving. All serious programmers should learn to use the remote debugger.
