Now that you’ve got Visual Studio Code installed and configured for WPILib, you can start creating robot programs. The WPILib extension contains a wizard to get you going quickly.
You can start coding before the robot exists, but if you have a physical robot available, so much the better. For this example, let’s assume we have the roboRIO set up on a test board, with a joystick, one motor and one motor controller.
Step 1: Create a new Robot Project
Start up VS Code. If the WPILib extension is properly loaded, then every window’s title bar will have a red hexagon around the letter “W”. This is a button that will open up the Command Palette to show all the WPILib commands.
![]()
Click on the “W” button, and select “Create a new Project”.

This will pop open the WPILib Project Creator window.

There are three buttons just under the welcome message.
- The first button lets you choose either Template or Example. Templates are bare-minimum projects that can be the basis for your robot program. Examples are projects for specific purposes. Examples can also be the basis for your work, but they are especially useful to demonstrate different robot functions.
- The second button lets you choose either Java or C++ programs.
- The third button picks a specific Template or Example.
For this example, we’ll specify a Java template for “Iterative Robot”. Fill in a parent folder, project name, and your team number. Generate the project and open it in the current window.
Once generated, VS Code will open the File Explorer sidebar, so you can see all the new files created. Go ahead and look at everything. In particular note that all the Java source code is under the “src” directory. Also, take a look at the “build.gradle” file which controls how the project is compiled and deployed.
This project is a complete robot program. You could deploy it to your robot, although it doesn’t do anything yet. Click on the “W” button and select “Build Robot Code”. All code will be compiled locally, and you should see the message “BUILD SUCCESSFUL”.
Step 2: Program to control one motor
From the File Explorer, open up the “Robot.java” file. This is the program executed by your robot. Read through the whole file.

The robot will execute Robot.java as follows:
- When the robot starts executing the program, it will initialize all class variables, and will then call robotInit(). Then, no matter what mode it is in, it will call robotPeriodic() repeatedly. The standard for FRC robots is to attempt 50 calls a second.
- When the robot transitions into autonomous mode, it will call autonomousInit() once and then call autonomousPeriodic() repeatedly.
- When the robot transitions into teleoperated mode, it will call teleopoInit() once and then call teleopPeriodic() repeatedly.
- There are also methods for testInit(), testPeriodic(), disabledInit(), and disabledPeriodic(). These are not often used.
To keep this tutorial really simple, we’re going to delete everything except robotInit() and teleopPeriodic(). Your bare-minimum robot program is below. Once you’ve modified it, hit the “W” button and try to “Build Robot Code”; you should get a successful build.

For this example, assume we have a joystick connected to drivers’ station and a motor controller connect to the roboRIO. We’ll create two variables around line 7 to represent them:
Joystick stick;
SpeedController motor;
Now we’ll instantiate the objects inside the robotInit() method:
public void robotInit() {
    stick = new Joystick(0);
    motor = new WPI_TalonSRX(2);
}
For my example, I’m using a Talon SRX connected to CAN ID 2. If you’re using any other motor controller, just change the line to reflect your hardware.
Next, change your teleop mode so it reads the joystick, and sets the speed of the motor:
public void teleopPeriodic() {
    double speed=stick.getY();
    motor.set(speed);
}
The getY() function tells us how for forward or backwards the joystick has been pushed. The speed value will be a number between -1.0 and 1.0.
Hit the “W” button and build robot code again. You should get BUILD SUCCESSFUL.
Step 3: Build and deploy
Now, connect all the hardware. Your laptop should connect to the roboRIO, either through USB, Ethernet, or through the radio. The joystick should be attached to the laptop.
Hit the “W” button and choose “Deploy Robot Code”. VS Code will compile the project again and deploy it out to the roboRIO. You should see BUILD SUCCESSFUL in the terminal window. The RioLog window will open inside VS Code.

The most common failure at this point is “Target roborio could not be found at any location”, which means that you’ve failed to make a network connection to the robot. Debug all the physical connections or maybe try a different way of connecting to the robot. Sometimes you will need to disconnect from all other networks, so VS Code isn’t trying to find your robot out on the open internet.
Step 4: Drive your robot
Start up the FRC Driver Station software. You should see green bars next to “Communications”, “Robot Code”, and “Joysticks”. Also, you should see your correct team number. If the team number is wrong, click the Gear icon on the left side to get to the setup panel.
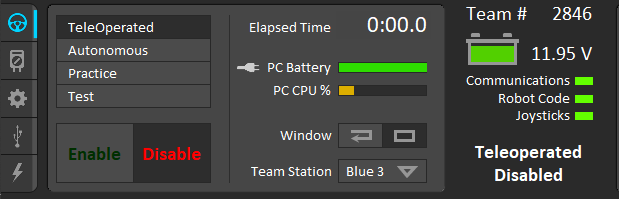
Click the “Enable” button to initialize teleoperated mode. You should now be able to drive the motor with the joystick.
Note that the RioLog window in VS Code is still connected and will show you console output from the roboRIO.
Consider for a moment what’s going on with the code. The robotInit() method was called once, and then teleopPeriodic() is being called 50 times a second. Each call of teleopPeriodic() reads the joystick and passes that value into the motor.
Further Reading:
- FRC Java Programming, at Screen Steps Live
-
Creating a new WPILib project in VS Code, also at Screen Steps Live
