Programming alone is sometimes difficult, but one programmer can only do so much. It’s better to work as a team. Groups of programmers can share the load, but having multiple people working on the same code adds additional challenges. You’ll need extra communication to keep everyone productive, and additional tools to keep from losing work.
Professional environments use Revision Control Systems to store the code, communicate the changes, and keep people from overwriting each other’s work. FRC programming teams should also use Revision Control.
Probably the most popular revision control system right now is git, a distributed version control system created by Linus Torvalds, the same guy who created Linux. You can use git from the command line, or from within development environments such as Eclipse, IntelliJ, and Visual Studio Code. GitHub is a web-based hosting service for git, and the GitHub corporation is a FIRST sponsor. All programming mentors and students can get free GitHub accounts, and FIRST teams can get upgraded Team Accounts.
To say that git is “distributed” means that every programmer will have a copy of the code, along with the history of the changes. There is also one remote repository of the code out on the internet. Programmers will occasionally pull changes from the remote repository to their local copy and occasionally push their own changes up to the remote repository. In this way, everyone eventually has the same code and the same history.
Combinations of the code files are called “commits“, and the word “commit” here is both a noun and a verb. Committing your changes creates a commit that you can retrieve later.
OK, I know that that was a lot of information. Honestly, git is a really deep subject, and companies that use it develop really complicated methodologies for its use. I do not recommend that FRC teams try to use everything in the git toolkit, or try to emulate commercial practices. Especially at first. Instead, let’s lay out the minimal functions.
Installing and configuring git
You are not required to install git, since there is a version packaged within Eclipse. However, you may choose to install it anyway. Instructions are at: https://git-scm.com/ .
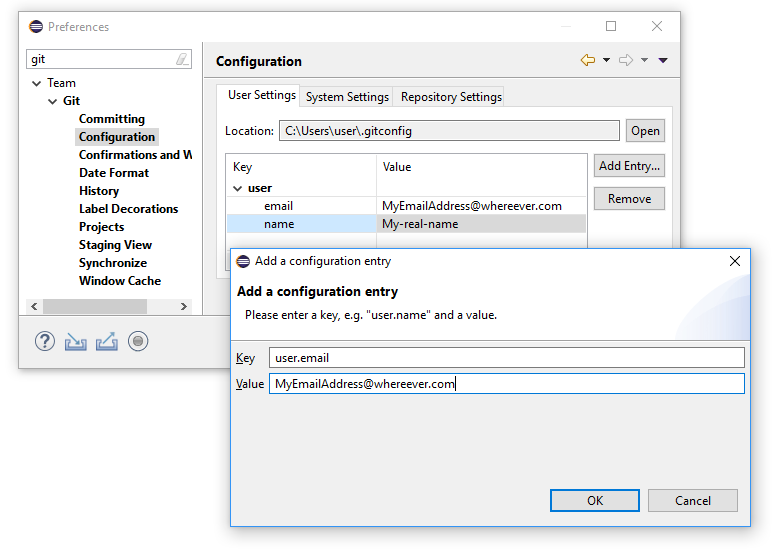
You should configure git to know who you are. This information will be added to the repository very time you commit. Open the Eclipse Preferences dialog and select Team > Git > Configuration. Add user settings for “user.email” and “user.name”:
Cloning an existing repository
Suppose that there is a repository on GitHub that you’d like to download to your laptop. Making a local copy is called making a clone.
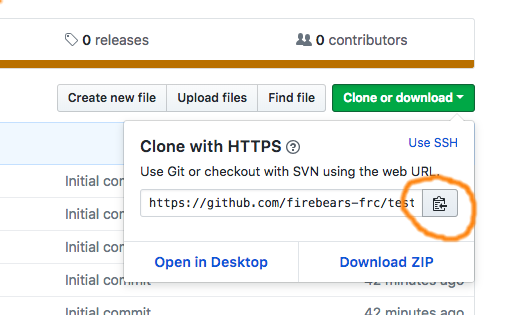
Consider the code repository at: https://github.com/firebears-frc/testrobot0. Go ahead and visit that page in a browser. Press the green button labeled “Clone or Download” and then press the little clipboard button. This will copy the repository’s formal URL into your clipboard.
Now go to Eclipse:
- From the main menu select File > Import…
- In the Import dialog, select Git > Projects from Git.
- Select Clone URI
- The Source Git Repository page should already be populated from your clipboard.
- For Branch Selection, select at least the “master” branch
- For Location Destination, make sure you’ve selected a plausible location, such as in your Documents directory.
- Specify the project type. In this case, choose to import existing Eclipse projects. Hit the Finish button
At this point you now have a clone of the repository on your machine. You won’t be able to push changes up to the remote repository unless the owner has granted you permission, but you can read, edit, and deploy this code to the robot.
Creating a new repository
Suppose you have a robot project on your local machine that has never been under git control, but you’d like to upload it into GitHub.
Open the project in Eclipse and then open a browser to https://github.com.
- In the browser, log into your GitHub account. Click on a green button that says either “New” or “New Repository”.

- Github will ask for a repository name. Give it the same name as project directory on your laptop. You can also specify a description. Probably you should make it a public repository.
However, do not add a README file or a .gitignore file or a license file. Your GitHub remote repository must be totally empty at this point. - After creating the repository, your browser will go to a page which displays your new repository URL. Copy this value into your clipboard.
- In Eclipse, right-click on the project name and select Team > Share Project…
- Check the box for “Use or create repository or create new one.
- Click on the Location of your project
- Click the “Create Repository” button
- Click the “Finish” button. Your project will now be initialized as a local git repository.
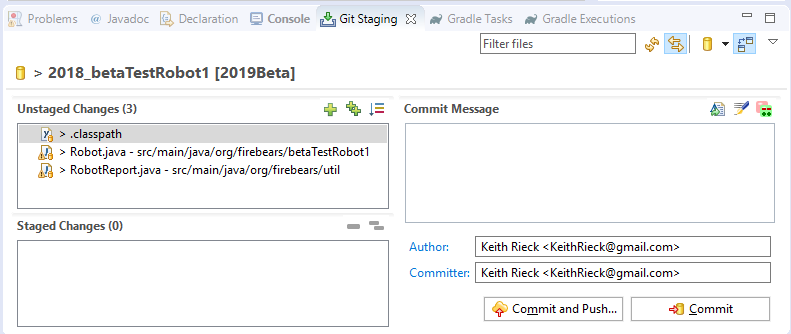
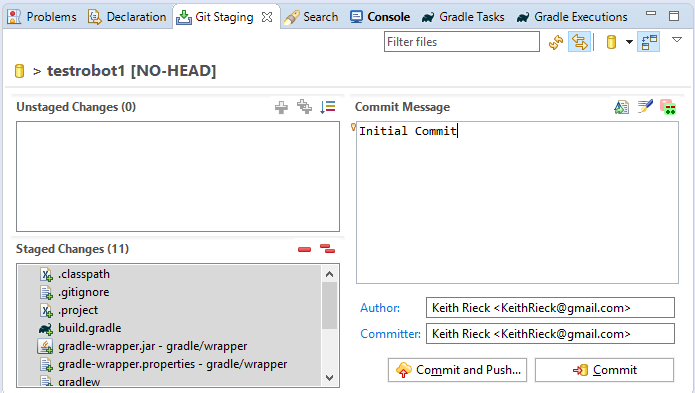
- Now you need to commit all your files. Right-click on the project and select Team > Commit… This will expose the Git Staging view.
- Drag all files from “Unstaged Changes” to “Staged Changes”
- Type in a Commit Message describing this commit. Normally you should put in something informative, but in this case just say “Initial commit”.
- Click Commit and Push…
- The Destination Git Repository dialog will be filled in based on your clipboard.
- Click the Next button twice to get to the “Push Confirmation” dialog. Push the Finish button.
- Now go back to your browser and visit the page for your new repository. You should now see all the files listed on the web page.
Committing changes to the code
From now on, when you add files, delete files, or modify files, git and Eclipse will keep track of how your code differs from the most recent commit. The Git Staging view keeps track of what has changed. When you are ready to make a commitment, drag the files you want committed into the “Staged Changes” area. Usually you’ll commit all changes, but you might choose to just stage a subset.
Type in a commit message. Try to write informative messages, since you and others will be reading this later. Good messages say things like “Updated autonomous commands for new encoder” or “Code changes after first regional”. Bad messages contain jokes or gibberish or say things like “changed stuff”.
After entering a useful message, hit the “Commit” button. This will commit your changes locally, but will not yet push those changes upstream to Github.
Pulling changes back from the repository
Suppose someone else has made changes to the code and pushed them up to the remote repository. You’d like to fetch those changes and merge them into our code. This is called doing a pull from the remote.
You can pull at any time, but it is usually best to commit your code locally before pulling. That is to say, commit the code but don’t push it up yet. Follow the directions in the previous section to do the commit.
To pull down changes, right-click on the project and select Team > Pull. The best case scenario (which is usually what happens) is that upstream changes will be seamlessly added to your code and everything will work perfectly.
One thing that might go wrong is that the changes pulled in will invalidate or undo something you are doing. You should always look over the incoming changes. Check the Problems view in Eclipse to see if new errors have been added. Recompile and run any relevant tests.
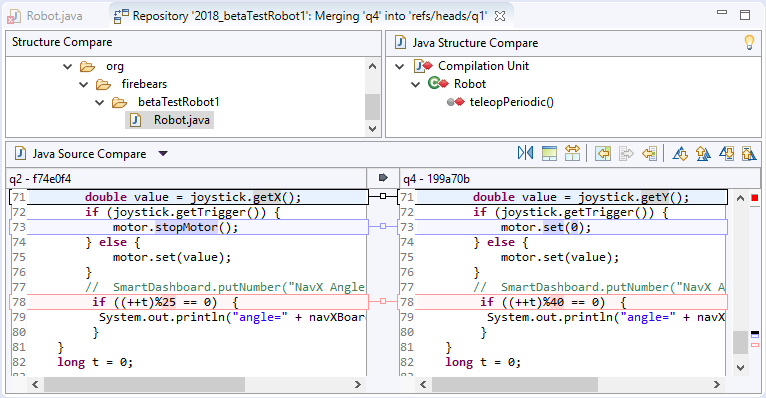
The worst case scenario is that someone else will have changed files that you are working on, and you will need to “merge” changes. The Git Staging view will show which files are in conflict.
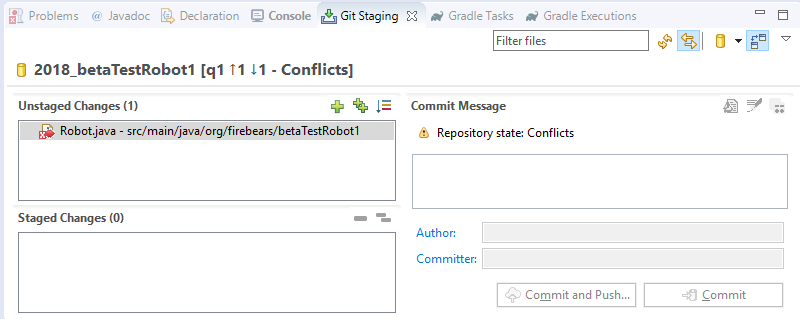
Right click on one of the conflicted files and and select the Merge Tool, which will show the differences between your commit and the incoming commits. In the picture below, local changes are on the left and incoming are on the right. Edit the left pane to be the compromise between these changes.
After you’ve modified a conflicted file and saved the changes, go back to the Git Staging view and drag the into the “Staged Changes” area. After merging all the conflicts, hit the “Commit” button.
Pushing your changes up to the repository
If you are ready to release your changes to the rest of the group, you can push your commits up to the remote repository.
If you are the only programmer working on a repository, you can push changes from the Git Staging view and its “Commit and Push…” button.
If there are multiple programmers, you should just “Commit”. Later, you can push all changes by right-clicking the project and selecting Team > Push to Upstream.
Synching with the remote repository
There’s an important discipline that everyone must develop with respect to the remote repository, which is that you should always pull in remote changes before pushing up your own. If there are incoming changes, then you must recheck the merged code to verify that it is OK.
With multiple programmers, you should perform the following steps manually:
- Commit your changes locally.
- Pull remote changes, and deal with any merge conflicts.
- Verify that the merged code compiles correctly and that the code works correctly. If there are any problems, fix them and then go back to step 1.
- Push all commits to the remote repository.
Further Reading:
- XKCD explains git
- Pro Git : a free book about git
- The Git Glossary: because the terminology of git can be pretty inexplicable.
- Egit documentation: official docs for the Eclipse integration to git.
